Mya is a young adult with dyspraxia living in the Blacksburg area. Due to her dyspraxia she is has limited fine motor control in her limbs and is unable to walk. During her childhood she had a therapy tricycle that allowed her to develop enough muscle strength in her legs to be able to partially walk again.
However these tricycles are extremely expensive, usually starting at around $800. Once Mya outgrew the tricycle her family was unable to afford a replacement and the muscles in her legs eventually atrophied.
Our team was asked to take the existing tricycle and modify it to meet Mya’s current size and needs.
The Tricycle Itself
The tricycle works by having one person who sits in the seat of the tricycle and one person who pushes and steers it from behind. There is the ability to steer for the person in the seat as well but it is primarily steered by the person in the back.
The aim of the machine is to allow the person seated in it to receive physical therapy by stimulating the muscles in the legs with the movement of the pedals.
When the trike came to us it had a single bar steering system, a padded seat with seat belts, a handle-bar with steering ability for the person seated in the trike seat, a standard bike breaking system, and pedals that rotated freely on the axel that attached them to the gears.
Please note this was the only image I could find of all of the tricycle components before we made modifications and that the tricycle is upside down in this image!
Pedals
Beyond helping with the general disassembly and reassembly of the components of the trike, I was focused on ideating on how to address the issues with the pedals, below are sketches to demonstrate the state of the original pedals:

Pedal if held level

Pedal if not held

Pedal in real life
Below are illustrations of issues that Mya had when interacting with the original design of the pedal:

Uncomfortable postures in the upwards direction caused by to hyperextension and freely rotating axel securing the pedals

Uncomfortable postures in the upwards direction caused by to hyperextension and freely rotating axel securing the pedals
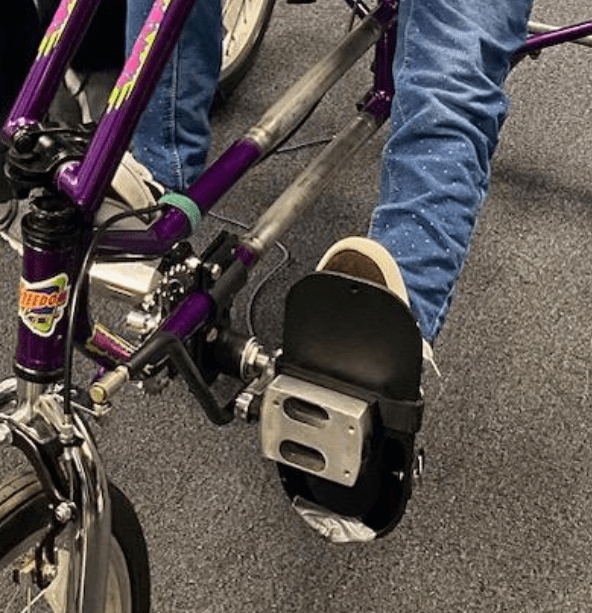
Picture of it happening to Mya in real life

Illustration to explain the interaction of the pedals with the splaying in the legs
For the tricycle to be able provide proper physical therapy we needed to make sure that Mya’s legs were going to be comfortably maintaining the correct posture during use. To do this we needed to balance the pedals and keep the legs in line with the pedals. Below is the design process for both of these:
Leg Support
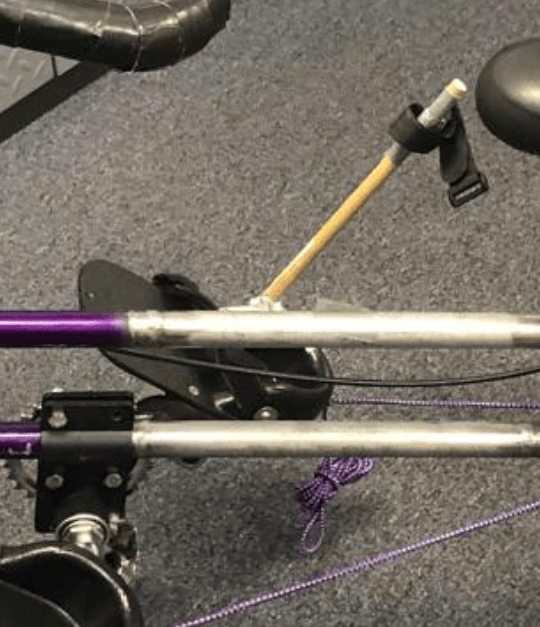
To help with the splaying in the legs we decided that we would create a brace that would allow for the leg to be kept in the correct posture for physical therapy. To test this concept, I created a low fidelity prototype using a wooden dowel and a Velcro strap. This was screwed into the existing pedal and was used as a proof of concept when meeting with Mya, her family and Physical Therapist.
A note for anyone planning to use this method of testing in the future: would recommend providing multiple heights to try out during the testing session so that you can make the most of your client meeting! It would have been great to have been able to try different heights to see how she and her family interacted with during the fitting session.

After this testing session, Mya’s physical therapist approved that the bracing would help with keeping the her legs in a posture that was conducive to physical therapy. However during the session we found a new user need for this design: the ability to remove and re-attach the brace easily. Mya’s family need to lift Mya up entirely to place her in the tricycle seat, as she is unable to do this herself. To make this as easy as possible, there needs to be minimal obstructions. Having a rigid brace sticking out of the sides of the trike presented a potential hazard for Mya and her family.
From here we began to consider how we would make the brace dis-attach and re-attach, and how we would attach the straps:

Decisions on bracing:
In the sketch here you can see some ideation on the brace and whether or not we should add a back bracing for the leg either rigidly (PLA) or flexibly (fabric). In the first sketch you can see the idea of having the bracing on both sides and in the second you can see it on one side like the prototype.
It was eventually decided that having bracing on both sides would pose some issues that did not make up for its benefits, those being:
- Make it harder and potentially more complicated to secure the brace onto the pedals
- Having a brace piece that was on the internal side of the pedals and going up and down with the rotation of the pedals posed the risk of injuring or causing discomfort to Mya during a ride.
Due to this, we decided that we would stick to the brace support design presented in the prototype, especially considering it had been approved by the PT during the testing session.
Decisions on locking mechanism:
With making sure that the attachment would lock into place we initially discussed the idea of it having it attached with a clevis pin. However, we quickly realized after further deliberation that this would not be convenient or easy for something that would need to be taken off and put back on again frequently.
From here, it was decided that having it so that the brace piece would slot into the pedal and lock into place with a piece that could be loosened again for removal from the outside would be the more convenient approach from a usability standpoint.
This mechanism was then designed and modelled by another member of my team.
